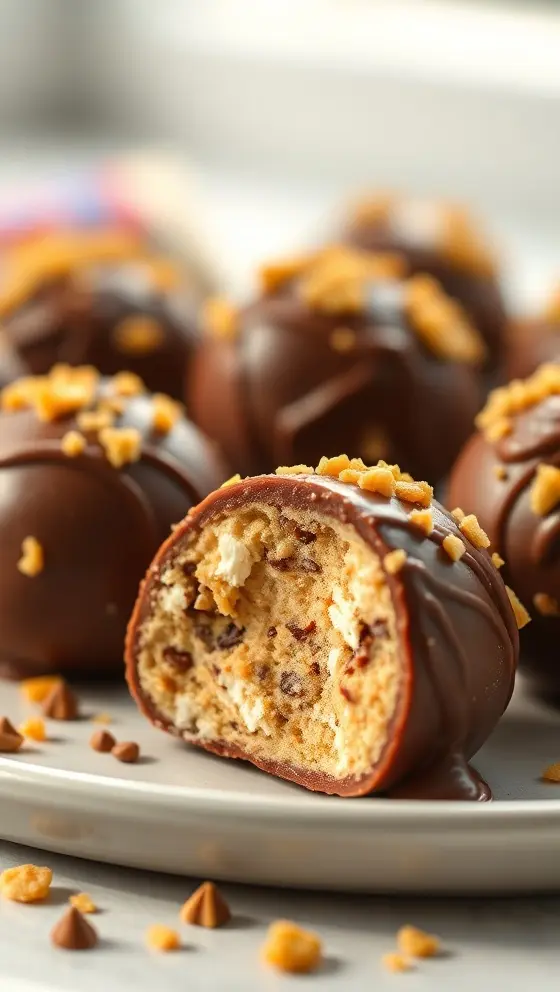
Butterfinger Balls Easy No Bake Sweet Treats
Introduction
If you’re looking for a sweet treat that combines the delightful crunch of a candy bar with the simplicity of a no-bake dessert, you’ll love Butterfinger Balls. These easy no-bake sweet treats are perfect for satisfying your sweet tooth without the hassle of baking. With just a handful of ingredients, you can whip up a batch that’s sure to impress at parties, gatherings, or even as an indulgent snack at home. In this blog post, we’ll guide you through the process of making these irresistible Butterfinger Balls while exploring tips, timing, and common pitfalls to keep in mind for the best results.
Ingredients List
To make Butterfinger Balls, you will need the following ingredients:
– 1 cup crushed Butterfinger candy bars
– 1 cup creamy peanut butter
– 2 cups powdered sugar
– 1 teaspoon vanilla extract
– 1 cup chocolate chips (milk, dark, or white, depending on your preference)
Timing
The beauty of Butterfinger Balls lies in their quick preparation time. Here’s a breakdown of how long each step will take:
– Preparation Time: 15 minutes
– Chill Time: 30 minutes
– Total Time: 45 minutes
This simple timing ensures that you can quickly enjoy these delicious treats!
Step-by-Step Instructions
Now, let’s dive into the step-by-step instructions for making these heavenly Butterfinger Balls, keeping in mind the focus keyword, “Butterfinger Balls,” ensures that everyone knows how to create these easy no-bake sweet treats.
1. Prepping the Ingredients: Start by gathering all your ingredients and measuring them out. This allows for a smooth preparation process.
2. Mixing the Base: In a large mixing bowl, combine the crushed Butterfinger candy bars and creamy peanut butter. Use a spatula or spoon to mix them until they are well blended.
3. Incorporating the Sweetness: Gradually add in the powdered sugar and vanilla extract to the mixture. The key here is to continue mixing until everything is smoothly combined and has a dough-like consistency.
4. Forming the Balls: Once your mixture is ready, use your hands to scoop out a small amount (about a tablespoon) and roll it into a ball shape. Place the balls onto a parchment-lined baking sheet for easy cleanup.
5. Chilling the Treats: After shaping all the balls, place the baking sheet in the fridge and allow them to chill for at least 30 minutes. This step helps them firm up, making them easier to dip in chocolate.
6. Melting the Chocolate: While the Butterfinger Balls are chilling, melt the chocolate chips in a microwave-safe bowl. Heat in short bursts of about 20-30 seconds, stirring in between until smooth.
7. Dipping the Balls: Once melted, take each chilled ball and dip it into the chocolate, ensuring it’s fully coated. Use a fork to lift it out, allowing any excess chocolate to drip off before placing it back on the baking sheet.
8. Setting the Chocolate: Place the dipped balls back in the fridge for an additional 30 minutes to let the chocolate set completely.
By following these step-by-step instructions, you will have perfectly formed Butterfinger Balls, ready to be enjoyed!
Nutritional Information
Understanding what you’re eating is essential, so here’s a summarization of the nutritional information per serving (assuming about 15 servings):
– Calories: 170
– Total Fat: 9g
– Saturated Fat: 3.5g
– Cholesterol: 0mg
– Sodium: 50mg
– Total Carbohydrates: 22g
– Dietary Fiber: 1g
– Sugars: 17g
– Protein: 3g
Please note that these values may vary based on ingredient brands and quantities used.
Tips
To achieve the best Butterfinger Balls, consider the following tips:
– Crushed Butterfingers: Ensure that your Butterfinger candy bars are well crushed; this will enhance the textural crunch in the final product.
– Room Temperature Ingredients: Allow peanut butter to be at room temperature for easier mixing and enhanced creaminess.
– Chocolate Alternatives: Feel free to explore with various types of chocolate—white, dark, or even milk chocolate for different flavor profiles.
– Storage: Store the finished Butterfinger Balls in an airtight container in the refrigerator for up to two weeks.
Alternative Methods
For those who are looking to experiment even further with Butterfinger Balls, here are a few alternative methods to consider:
– Add-ins: Consider adding finely chopped nuts or a sprinkle of sea salt on top of the chocolate for an extra flavor dimension.
– Flavor Variations: Mix in a few tablespoons of cocoa powder with the dough for a chocolatey twist on traditional Butterfinger Balls.
– Different Dips: Instead of chocolate, try rolling the balls in shredded coconut or crushed nuts before chilling for unique texture and flavor.
Common Mistakes to Avoid
Even though making Butterfinger Balls is straightforward, here are some common mistakes to steer clear of:
– Overmixing the Dough: Mixing too long can create a dense texture; mix until just combined.
– Not Chilling Properly: If you skip the chilling step, the balls may lose shape when dipped in chocolate. Ensure they are adequately firm before dipping.
– Too Much Chocolate: Using too much chocolate can overshadow the flavor of the Butterfinger and peanut butter. Aim for a thin layer of chocolate coating.
– Skipping the Baking Sheet: Always line your baking sheet with parchment paper; it makes the balls much easier to remove once they set.
Conclusion
In conclusion, Butterfinger Balls are easy no-bake sweet treats that bring the irresistible crunch and flavor of your favorite candy bar into an adorable, bite-sized form. Following our detailed instructions will lead to delightful results that please every palate. The combination of creamy peanut butter, sweet candy, and rich chocolate creates a layered flavor experience that you simply cannot resist. We encourage you to try making Butterfinger Balls at home, enjoy the process, and share the results with family and friends. Don’t forget to return to our website for more delightful recipes that will inspire your culinary adventures!
FAQs
1. Can I use crunchy peanut butter instead of creamy?
Absolutely! Crunchy peanut butter will add an extra layer of texture to your Butterfinger Balls.
2. How do I store the Butterfinger Balls?
Store them in an airtight container in the refrigerator for up to two weeks. They can also be frozen for up to three months.
3. Can I make them ahead of time?
Yes, you can prepare and chill the Butterfinger Balls a day or two in advance. Just coat them in chocolate right before serving.
4. What can I substitute the powdered sugar with?
You can use granulated sugar, but the texture may be different. Adding a bit of cornstarch can help maintain that powdery softness.
5. Can I use other candy bars?
Certainly! Feel free to experiment with other candy bars, though the flavor and texture will vary. Just ensure the ingredients complement peanut butter.
The simplicity and deliciousness of Butterfinger Balls make them a must-try! Happy cooking!
Butterfinger Balls Easy No Bake Sweet Treats

Ingredients
- 1 cup crushed Butterfinger candy bars
- 1 cup creamy peanut butter
- 2 cups powdered sugar
- 1 cup chocolate chips
- 1 tablespoon coconut oil
Instructions
- In a mixing bowl, combine crushed Butterfinger bars, peanut butter, and powdered sugar until well mixed.
- Form the mixture into small balls and place them on a baking sheet lined with parchment paper.
- Melt chocolate chips and coconut oil in a microwave-safe bowl, stirring until smooth.
- Dip each ball into the melted chocolate, ensuring they are fully coated.
- Return the chocolate-covered balls to the baking sheet and refrigerate until the chocolate is set.
Nutrition Information
- Calories: 150 kcal
- Protein: 3g